When Nick and I were in the process of buying our very first home together, one of my requirements was that I really wanted work on a project together and flip whatever kitchen we ended up with. I've always dreamed of having a "modern" all white kitchen for so long now. There's just something about the color white that I love. I think it makes a space feel fresh, bright, and like you can do anything to it.
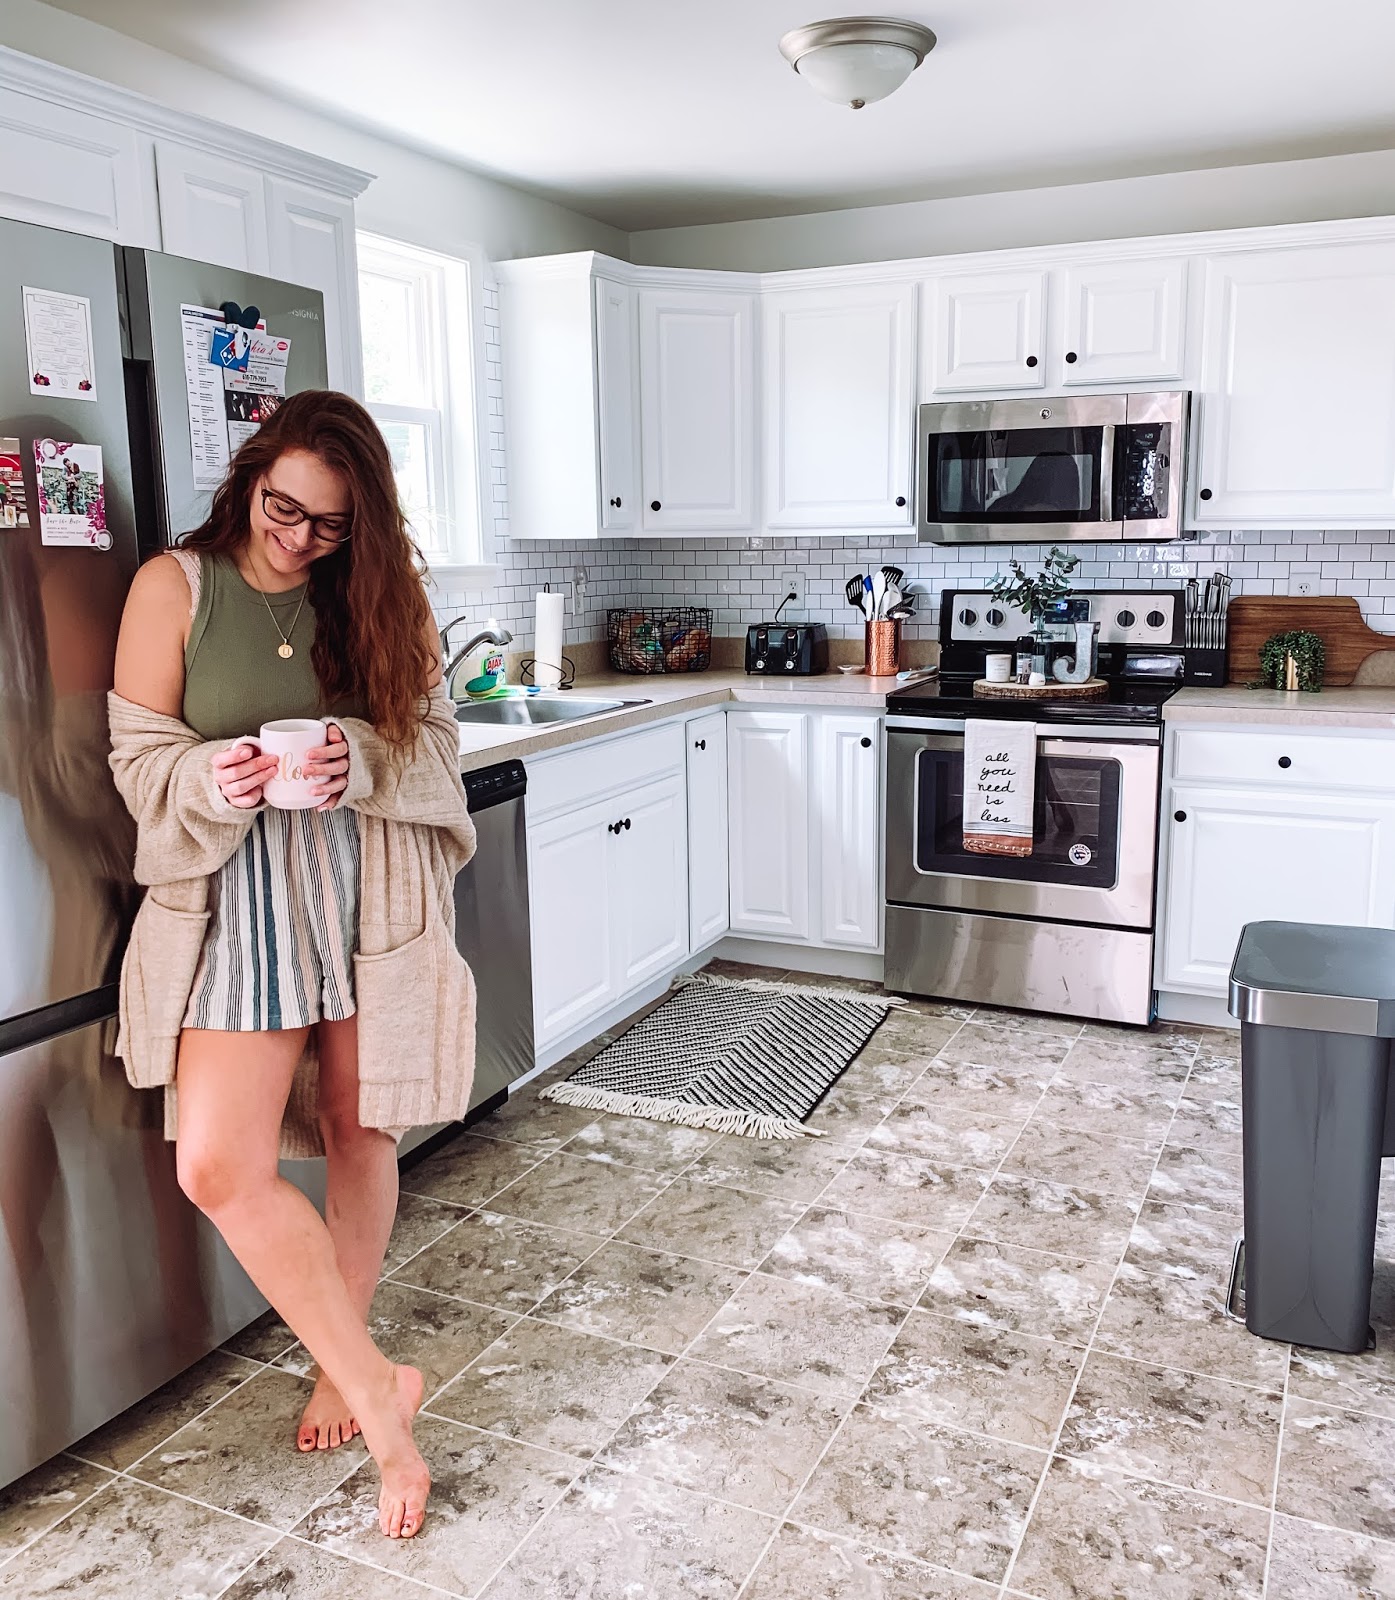
We managed to successfully flip our kitchen for a grand total of $307 with all these products! I'll break down all of our costs below. We ended up painting our cabinets, adding all new hardware, and added a classic subway tile backsplash. To be honest, it looks like a completely different kitchen.
When we bought the house we ended up with, the kitchen was actually just renovated. The home was a flip, and the sellers had put in all new brown cabinets, and flooring. Don't get me wrong, the kitchen was beautiful, but we wanted to be able to add our own touch to the home to make it ours! Plus, my style has always been Farmhouse, and I finally wanted a kitchen in my life for once that I was proud of, and that was mine.


1. Collect all supplies
AMAZON GIANI PAINT/PRIMER KIT:
We started off with this kit for some of the basics. Typically in most kitchen renovations, you should sand your cabinets to get rid of imperfections/grains/etc, but we decided to skip that step. We liked the wood look, and went with this all in one kit which included a roller, roller cover, brush, instructions and of course paint. We only needed one can. ($69.95)
- PAINTERS TAPE: Essential! We used this around all of our appliances, walls and the floor so the paint job would look crisp and clean. I recommend getting something wider than we did though. We ended up needed paint remover afterwards. ($6.48)
- SMALL PAINT BRUSHES: These are essential for getting in crevasses, and evening out paint brush strokes. We bought 2. ($1.26 each)
- FOAM BRUSHES: We picked these up this 6 pack as well to allow paint to get in all the wood grains, and they ended up being my most used brush. ($5.98)
- PAINT ROLLERS: The kit only came with one roller, but we bought a few more for extras. These will be essential in getting the larger parts of your cabinets/frames. Makes the process go quick and easy! We picked up a small set that came with a few brushes and a roller. ($5.57)
- PLASTIC SHEETING: I definitely recommend getting this if you don't want to get paint on anything! We painted on our dining room table, so we covered the table and floor in this, as well as our garage floor. ($7.59)
- PAINTER'S TRIPODS: These are used to prop your cabinets up to dry. We used these in the very beginning, but didn't really find them that helpful. The cabinets kept falling off, and we had way more cabinets than tri-pods. We ended up finding small boxes we had from moving, and propped the cabinet up with boxes. ($6.46)
- PAINT TRAY: Used to hold the paint, and to dip your roller brush in to get a good coat on the brush. ($2.98)
- PAINT REMOVER: We should have gotten thicker painter's tape because we did end up getting paint on some of our appliances. This came in handy to easily remove it. ($7.98)
- HARDWARE: The fun part! We ordered our hardware from Amazon, because it was a bit cheaper than Lowe's or Home Depot. We got a 25 pack for under $30! The quality is fantastic. They are metal/heavyweight, and went on super easy. ($28.97)


2. Prep the cabinets
- TAKE OFF ALL CABINET DOORS/HARDWARE: We layed all of them in our garage over plastic sheeting as well in our dining room over plastic sheeting. We also made sure when taking each individual cabinet off to name it so that we could label it with tape and match it with the corresponding hardware. This is super important so that you aren't scrambling trying to figure out what hardware goes to what cabinet. We put all the small pieces in plastic bags and called it the same name as the corresponding cabinet.
- WASH CABINETS/FRAMES: You want to make sure you remove all grease and dirt before putting a fresh coat of paint on.
- SAND/PRIME (OPTIONAL): Most people would tell you to sand if you want flat cabinets and so that the paint has something to stick to, but we chose to skip both of these step because the paint we got (Cabinet & Furniture Paint Kit) required no sanding or priming.
- TAPE: Tape around all appliances, countertops, etc so that you have nice, neat, clean lines.

3. Start painting!
- CABINET DOORS: We started only with the top cabinet doors first. We used the roller to get the main area of the cabinets, and then I took a sponge brush to get in all the places the roller wasn't able to reach. Most of our cabinets ended up required 4 coats with the paint we chose until we were happy with the shade of white. It typically takes 4-8 hours for the paint to dry, so we were able to do 1-2 coats per day.
- CABINET FRAMES: While we would wait for the cabinets to dry, we began painting the frames. Since the cabinet doors cover most of the frame, we were happy with 3 coats. I would say painting the frame was the most tedious part because it was so large. Again, we used the roller for the main areas, and I used the sponge to get in the wood grains, and corners.

4. Add hardware/Finishing touches
- Start to re-install all cabinet doors back on to their original location. Don't forget to add your new knobs! :) This was my favorite part, and really made the new cabinets come to life.
- We also added on new padding to the backside of the doors so they don't slam and ruin the paint. We picked these up for $1 at Dollar Tree.

HOW WE DID OUR BACKSPLASH:
This part was actually the most "costly" part of the entire process. We picked up this stick and peel backsplash tile up from Amazon, and y'all... It's AMAZING! Can you believe our tile isn't even real? We were so impressed with the quality, and how it makes our kitchen look. I thought when ordering, it was going to almost be more like a wallpaper... Nope! It has the real texture of subway tile, as well as it's very thick, and has a clear top layer that has a wipeable surface for an easy clean.


Since I had so many extra tiles left over, I decided to go up the sink wall. Originally I wasn't going to, but didn't want the rest to go to waste. I'm SO glad I did, because I just love how it came out! Really adds that extra wow factor to the kitchen by going all the way up the window. I still ended up with only 2.5 tiles left :) Maybe I'll find some small space in the house sometime to use them.


1). Collect Supplies
- BACKSPLASH: There a ton of options to choose from when it comes to ordering backsplash. We went with a stick and peel because we didn't want to spend the extra money to hire someone to come out and do real backsplash, and also we didn't know how to do it ourselves, nor did we have the tools. We looked at our local Lowe's and Home Depot, and none of the options were what we were looking for. So instead, I stumbled upon this stick and peel tile from Amazon. You can order it in packs of 1, 5 or 10. We ordered 3 packs of 10 ($56.98/each), and ended up using 28 out of 30 tiles. ($170 total)
- SCISSORS/EXACTO KNIFE: You will use these to cut the tiles in order for them to fit in certain areas of the wall. Around the bottom frame of our window was the hardest part. ($5.49)
- WASH THE WALLS: Just like prepping for the cabinets, it's all important to prep/clean your current backsplash or wall to get rid of all dirt or grease. This will enable the tile to stick better.
- RULER: To measure areas you may need to cut, or cut around for spacing.
- DRY ERASE MARKER: This will make your life so much easier when you need to mark down measurements etc since the surface is wipeable.
2) Stick it on!
- PUTTING ON THE ADHESIVE TILES: The tile came in 12"x12" pieces. They each fit together like a puzzle which was awesome, and made a lot of the process go very smoothly!
- CUTTING/MEASURING: We had to cut for the corner walls, under the window, and holes for the outlets. This took a lot of measuring. We stuck them on the wall like a puzzle for the entire bottom row of the kitchen. For the 2nd row I had to cut the tiles down much smaller so they would fit right below the cabinets since there was less than 12" of space left.


All in all, this process took us about 2.5-3 weeks total because of Nick and I's busy schedules. Our kitchen is still not fully finished as I still have a ton of decor I want to add, and spice shelving, but for right now, I truly love walking into this new space everyday. It feels so fresh, clean, and like ours.
I hope this post was able to help give you ideas on how to potentially re-do your own kitchen if you've been looking for a DIY project of your own :) Feel free to reach out to me if you have any questions!
SHOP THE POST HERE

Love this!!! You did a great job, what color paint did you use?
ReplyDeleteThank you! We used Valspar Cabinet & Furniture paint Ulta White!
DeleteFloors are simple to install, which makes many individuals request that how introduce floors without anyone else. It's anything but amazing; hardwood floors offer a wide cluster of stylish choices with changing alternatives for hardwood floor completes and their sturdiness is significantly better compared to other floor selections. These floors will suit practically any inclination, taste, and condition installation of flooring. Assuming installing wood floors is one of your choices, you might need to examine on to work out how to install floors.
DeleteThank you! You did an amazing job, and it really gave me the confidence to handle this small project..
ReplyDeleteI am so glad to hear that! I'd love to see how it turned out!
DeleteHey! Thanks for sharing this.
ReplyDeleteI was just wondering how you’re backsplash is holding up after some time has passed now?
Wonderful! It still looks just as good as the day we installed it!
DeleteCan you see the wood grain through the white paint you used?
ReplyDeleteYes! We didn't sand the cabinets down because we wanted the wood look
DeleteThis looks awesome! Was the wall (backsplash area) textured prior to using the peel n' stick tile?
ReplyDeleteThank you! It was just a flat surface painted wall. Hope that helps!
DeleteHow has the paint held up so far?
ReplyDeleteIt definitely needs a little re-touch, but nothing bad! Maybe re-touch it up every 2 years
DeleteThere are various benefits of utilizing the assistance of an expert garbage pulling organization, on the whole and premier, you need to guarantee that you pick the help which is ideal for you to take care of business adequately.removals west London
ReplyDeleteI absolutely love this great job I love a white kitchen I too have wood cabinets I found this helpful to change mine to white thankyou from Sarnia Ontario Canada
ReplyDeleteOne more expert to renovating your kitchen is the way that you will, basically, be getting another kitchen. kitchen remodeler st. louis
ReplyDeletePoker No. 1 in Thailand, we have gathered the best of both pros and novices for you to play 24 hours a day with advice on how to play poker online.โป๊กเกอร์ (poker)
ReplyDeleteNice one for picking the correct to debate this amazing, I think eagerly in it and true love researching a little more about this specific area. Any time probable, when you get to competencies, you imagination adding all of your blog page by working with further more facts? This can be very ideal for everyone. kitchen remodeling near me
ReplyDeleteThe kitchen is maybe the main spot in the house. Redesigning a kitchen with the most recent conveniences, inside a restricted financial plan requires the abilities, skill and experience of a decent kitchen rebuilding creator. kitchen remodeling
ReplyDeleteIf you are buying a new house or having a contractor do the major and basic modernization of your kitchen, you will undoubtedly be confronted by blueprints. https://shuttlesky.in/
ReplyDeleteBecause of this, parents are looking for new safe kitchen renovation designs to minimise the risk of injury. About Goater Jones
ReplyDeleteI think that thanks for the valuabe information and insights you have so provided here. Read more
ReplyDeleteWhile making your kitchen redesigning thoughts you should contemplate the accessible space you have and afterward get inventive. kitchen remodeler st. louis
ReplyDeleteLove walking into your space :)
ReplyDeletefloorcleaningtools.
Thanks for the article post. Thanks Again. Cool.Tamil Recipes
ReplyDeleteHere you will learn what is important, it gives you a link to an interesting web page: Best Chefman Air Fryers
ReplyDeleteIt is somewhat fantastic, and yet check out the advice at this treat. Check it out
ReplyDeleteYou ought to basically fantastic not to mention solid advice, which means notice: Read more
ReplyDeleteThe value added with this space could be a potential negative as the market narrows as less people are looking for bedroom/apartment basements in a home. basement renovations midhurst
ReplyDeleteCauses of hair loss in men
ReplyDeleteMen are more likely to experience hair loss than women, and the reasons for this are still unknown. Some believe that it may be due to a combination of hormonal changes and genetics, while others say that it’s simply a result of aging. Other hair loss causes in men are further discussed in this article so continue reading to learn more! Read more here
Best acne medication
ReplyDeleteThere are a few types of acne medications that can be used to treat the skin condition. Acne treatment usually includes using a combination of over-the-counter and prescription medications. Some of the most common acne medications are topical retinoids, antibiotics, benzoyl peroxide, and sulfur products. It is important to choose the right medication for your specific case, as some may not be effective for everyone. In this article, the list of the best acne treatments will be discussed which you can use for reference. Read more here